开发环境
- Ubuntu22.04
- 京东云2h4g服务器
- Hugo version: 0.141(下载的时候没注意,直接就下了最新版了)
- PaperMod version: 2025-01-22最新版本(git安装的)
相关文档
官方文档
参考文章
开始
hugo安装
# 从github下载需要版本的hugo
wget https://github.com/gohugoio/hugo/releases/download/v0.141.0/hugo_extended_0.141.0_Linux-64bit.tar.gz
# 解压
tar -xvzf hugo_extended_0.141.0_Linux-64bit.tar.gz
# 移动hugo到/usr/local/bin/
sudo mv hugo /usr/local/bin/
# 查看是否安装成功
hugo version
安装主题
我使用的是PaperMod主题,在PaperMod的基础上进行了一些魔改,参考这个网站,PaperMod下载按官网流程即可
# 配置文件用yaml,别问为什么,都是这样推荐的,能用就行
hugo new site MyFreshWebsite --format yaml
# replace MyFreshWebsite with name of your website

cd MyFreshWebsite

# 初始化git
git init

# 安装PaperMod
git clone https://github.com/adityatelange/hugo-PaperMod themes/PaperMod --depth=1

# 这部分应该是在git仓库里建了一个子仓库,方便从github更新PaperMod,我觉得没啥必要,更新的情况太少,能跑够用就行了,需要的话手动更新就行了
cd themes/PaperMod
git pull
cd ../..
git submodule add --depth=1 https://github.com/adityatelange/hugo-PaperMod.git themes/PaperMod
git submodule update --init --recursive # needed when you reclone your repo (submodules may not get cloned automatically)

git submodule update --remote --merge

# 这部分记不太清了,不搞明白有什么作用
hugo mod init YOUR_OWN_GIT_REPOSITORY
配置文件
新版配置文件名称默认为hugo.yaml
参考的其他人的介绍的配置文件,这个注释较多就用这个了,请根据需要修改
主页显示我用的profileMode,这个好看点,默认和文章界面重复了
# 起始 URL(换成您自己的域名)
baseURL: 'https://hugo-start.pages.dev'
# 网站标题
title: 'Hugo Start'
# 每页显示的文章数量
paginate: 5
# 主题名称
theme: PaperMod
# 语言代码(zh-简体中文)
languageCode: 'zh'
DefaultContentLanguage: 'zh'
# 是否有 CJK 语言(中-日-韩)
hasCJKLanguage: true

# 是否生成 robots.txt
enableRobotsTXT: true

# 是否构建草稿
buildDrafts: false
# 是否构建未来的文章
buildFuture: false
# 是否构建过期的文章
buildExpired: false
# 是否启用 Emoji
enableEmoji: true
# 是否启用 Git 信息
enableGitInfo: false

# Google Analytics ID
googleAnalytics: ''

# 压缩输出静态文件
minify:
  # 是否不压缩 XML 文件
  disableXML: true
  minifyOutput: true

# 全局配置
params:
  env: production
  # 网站标题
  title: 'Hugo Start'
  # 网站描述
  description: 'Hugo Start with PaperMod'
  # 网站关键词(大部分搜索引擎已放弃,可注释掉)
  # keywords: [Blog, Portfolio, PaperMod]

  # 网站作者
  author: 'Your Name'
  # 多个作者写法
  # author: ["Me", "You"]

  # OpenGraph / Twitter Card 预览图片(/static 下面的文件名称)
  images: ['opengraph.webp']
  # 日期格式
  DateFormat: '2006-01-02'
  # 默认主题
  defaultTheme: auto # dark, light
  # 是否启用主题切换按钮
  disableThemeToggle: false
  # 是否启用阅读时间展示
  ShowReadingTime: true
  # 是都启用分享按钮
  ShowShareButtons: true
  ShowPostNavLinks: true
  # 是否启用面包屑导航
  ShowBreadCrumbs: true
  # 是否显示代码复制按钮
  ShowCodeCopyButtons: false
  # 是否显示字数统计
  ShowWordCount: true
  # 是否在页面显示 RSS 按钮
  ShowRssButtonInSectionTermList: true
  UseHugoToc: true
  disableSpecial1stPost: false
  # 是否禁用首页滚动到顶部
  disableScrollToTop: false
  # 是否启用评论系统
  comments: false
  # 是否隐藏 Meta 信息
  hidemeta: false
  # 是否隐藏文章摘要
  hideSummary: false
  # 是否显示目录
  showtoc: false
  # 是否默认展开文章目录
  tocopen: false

  assets:
    # disableHLJS: true # to disable highlight.js
    # disableFingerprinting: true

    # 网站 Favicon 图标相关信息
    # 可在 https://realfavicongenerator.net/ 生成
    # 将图片复制到 /static 目录下
    # 然后修改下面代码中的文件名
    favicon: '<link / abs url>'
    favicon16x16: '<link / abs url>'
    favicon32x32: '<link / abs url>'
    apple_touch_icon: '<link / abs url>'
    safari_pinned_tab: '<link / abs url>'

  label:
    # 使用文本替代 Logo 标签
    text: 'Hugo Start'
    # 网站 Logo 图片(/static 下面的文件名称)
    icon: /apple-touch-icon.png
    # 图标高度
    iconHeight: 35

  # 主页展示模式
  # 个人信息模式
  profileMode:
    enabled: false # needs to be explicitly set
    title: ExampleSite
    subtitle: 'This is subtitle'
    imageUrl: '<img location>'
    imageWidth: 120
    imageHeight: 120
    imageTitle: my image
    buttons:
      - name: Posts
        url: posts
      - name: Tags
        url: tags

  # 主页 - 信息模式(默认)
  homeInfoParams:
    Title: "Hi there \U0001F44B"
    Content: Welcome to hugo start, this is a example of Hugo and PaperMod

  #  主页 - 信息模式 图标展示
  socialIcons:
    # - name: twitter
    #   url: "https://twitter.com/"
    # - name: stackoverflow
    #   url: "https://stackoverflow.com"
    - name: github
      url: 'https://github.com/DejavuMoe/hugo-start'
    - name: mastodon
      url: 'https://sink.love/@dejavu'

  # 站长验证
  analytics:
    google:
      SiteVerificationTag: ''
    bing:
      SiteVerificationTag: ''
    yandex:
      SiteVerificationTag: ''

  # 文章封面设置
  cover:
    hidden: true # hide everywhere but not in structured data
    hiddenInList: true # hide on list pages and home
    hiddenInSingle: true # hide on single page

  # 关联编辑
  editPost:
    URL: 'https://github.com/DejavuMoe/hugo-start/edit/master/content/posts'
    Text: 'Edit on GitHub' # edit text
    appendFilePath: true # to append file path to Edit link

  # for search
  # https://fusejs.io/api/options.html
  fuseOpts:
    isCaseSensitive: false
    shouldSort: true
    location: 0
    distance: 1000
    threshold: 0.4
    minMatchCharLength: 0
    keys: ['title', 'permalink', 'summary', 'content']

# 顶部导航栏
menu:
  main:
    - identifier: '首页'
      name: '首页'
      url: /
      weight: 1
    - identifier: '分类'
      name: '分类'
      url: /categories/
      weight: 10
    - identifier: '标签'
      name: '标签'
      url: /tags/
      weight: 20
    - identifier: '仓库'
      name: '仓库'
      url: https://github.com/DejavuMoe/hugo-start
      weight: 30
# Read: https://github.com/adityatelange/hugo-PaperMod/wiki/FAQs#using-hugos-syntax-highlighter-chroma
pygmentsUseClasses: true
markup:
  highlight:
    noClasses: false
    # anchorLineNos: true
    # codeFences: true
    # guessSyntax: true
    # lineNos: true
    # style: monokai

privacy:
  vimeo:
    disabled: true
    enableDNT: true
    simple: true

  twitter:
    disabled: true
    enableDNT: true # 是否启用添加“请勿跟踪” HTTP 头。
    simple: true # 如果启用简单模式,将建立一个静态的、无 JS 版本的推文。

  instagram:
    disabled: true
    simple: true

  youtube:
    disabled: true
    privacyEnhanced: true

services:
  instagram:
    disableInlineCSS: true # 禁用 Hugo 提供的内联样式
  twitter:
    disableInlineCSS: true # 禁用 Hugo 提供的内联样式
默认模板
文章创建时的默认模板,相对于config全局配置,这里是局部配置,控制文章显示的必要属性
---
title: "{{ replace .Name "-" " " | title }}"
date: {{ .Date }}
lastmod: {{ .Date }}
draft: true # 是否为草稿
author: ["tkk"]

categories: []

tags: []

keywords: []

description: "" # 文章描述,与搜索优化相关
summary: "" # 文章简单描述,会展示在主页
weight: # 输入1可以顶置文章,用来给文章展示排序,不填就默认按时间排序
slug: ""
comments: false
autoNumbering: true # 目录自动编号
hideMeta: false # 是否隐藏文章的元信息,如发布日期、作者等
mermaid: true
cover:
    image: ""
    caption: ""
    alt: ""
    relative: false
---

<!-- more -->
Github Pages部署网站
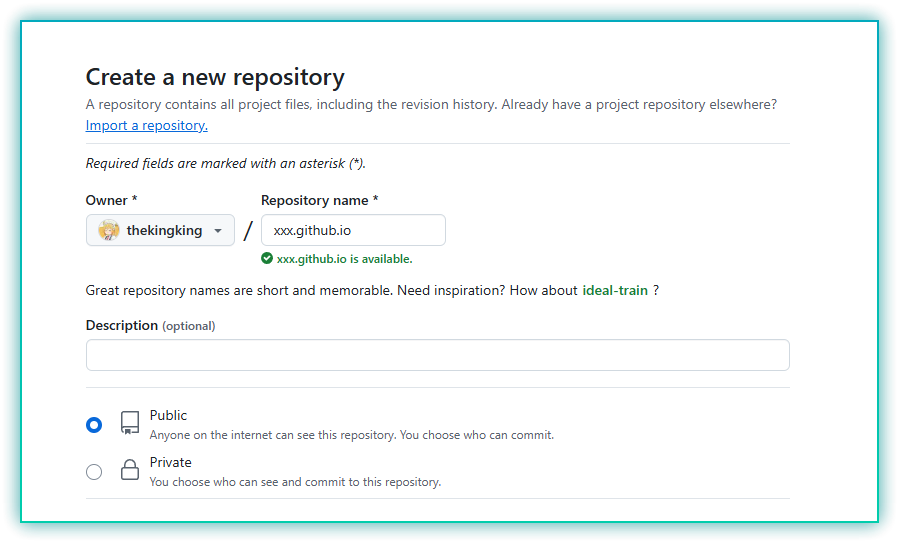
创建GitHub远程仓库
在Github创建仓库,仓库名填写[用户名].github.io,注意[用户名]部分必须是Github用户名,否则Github Pages不会正常工作。
勾选Add a README file,点击Create Repository,创建仓库。
将本地仓库推送到Github
在根目录下创建.gitignore,内容如下:
public
resources
.hugo_build.lock
创建远程仓库并提交
# [username]替换为用户名
git remote add origin git@github.com:[username]/[username].github.io.git

# 提交
git add .
git commit -m "Hugo + PaperMod"

# 推荐本地分支和远程分支名用main,免得不必要的麻烦(github安全检查)
git push -u origin main
访问github仓库,选择 Settings > Pages , 将Build and deployment中source设置为Github Actions
配置Github Actions
在本地仓库中创建文件.github/workflows/hugo.yaml,根据Hugo版本修改,内容如下:
# 用于构建和部署Hugo网站到GitHub Pages的示例工作流程
name: 发布Hugo网站到Pages

on:
  # 在目标为默认分支的推送上运行
  push:
    branches:
      - main

  # 允许您手动从“Actions”标签运行此工作流程
  workflow_dispatch:

# 设置GITHUB_TOKEN的权限,以允许部署到GitHub Pages
permissions:
  contents: read
  pages: write
  id-token: write

# 仅允许一个并发部署,跳过在进行中的运行与最新排队的运行之间排队的运行。
# 但是,请不要取消进行中的运行,因为我们希望这些生产部署能够完成。
concurrency:
  group: "pages"
  cancel-in-progress: false

# 默认使用bash
defaults:
  run:
    shell: bash

jobs:
  # 构建作业
  build:
    runs-on: ubuntu-22.04
    env:
      HUGO_VERSION: 0.141.0
    steps:
      - name: 安装Hugo CLI
        run: |
          wget -O ${{ runner.temp }}/hugo.deb https://github.com/gohugoio/hugo/releases/download/v${HUGO_VERSION}/hugo_extended_${HUGO_VERSION}_linux-amd64.deb \
          && sudo dpkg -i ${{ runner.temp }}/hugo.deb
      - name: 安装Dart Sass
        run: sudo snap install dart-sass
      - name: 检出
        uses: actions/checkout@v4
        with:
          submodules: recursive
          fetch-depth: 0
      - name: 设置Pages
        id: pages
        uses: actions/configure-pages@v3
      - name: 安装Node.js依赖
        run: "[[ -f package-lock.json || -f npm-shrinkwrap.json ]] && npm ci || true"
      - name: 使用Hugo构建
        env:
          # 为了与Hugo模块的最大向后兼容性
          HUGO_ENVIRONMENT: production
          HUGO_ENV: production
        run: |
          hugo \
            --gc \
            --minify \
            --baseURL "${{ steps.pages.outputs.base_url }}/"
      - name: 上传构建产物
        uses: actions/upload-pages-artifact@v2
        with:
          path: ./public

  # 部署作业
  deploy:
    environment:
      name: github-pages
      url: ${{ steps.deployment.outputs.page_url }}
    runs-on: ubuntu-latest
    needs: build
    steps:
      - name: 部署到GitHub Pages
        id: deployment
        uses: actions/deploy-pages@v2
提交,推送至远程仓库
git add .
git commit -m "Add workflow"
git push
未完成
评论系统
目前选择的是artalk作为评论系统,但是目前还存在问题,这是当前进度。
图床
随着文章数量增多,图片将会越来越多,而github仓库有大小上限,将图片放在github上是不合理的,之后会考虑构建一个图床,但是存在和评论系统同样的问题,暂时没有构建